Previous Status
Continue on previous post https://blog.sakuragawa.moe/simple-homebrew-kubernetes-deployment/
And this should be suitable for any working Kubernetes cluster with some storage node.
The Kubernetes cluster bootstrapping is complete but storage is not defined in the cluster, it's not possible to persist any data after the deletion of pod. in another word, if deploy a database pod and it restarts, all data will be lost.
What is waiting to be implemented here is to create a resource so called CSI: Container Storage Interface, to persist and manage all data consumed by pod.
What is needed in next step
Ceph block storage system is the one suitable here, and it can be deployed and managed by rook which rely on Kubernetes to orchestrate.
Refer to : https://github.com/rook/rook
Kubernetes meets ROOK/Ceph
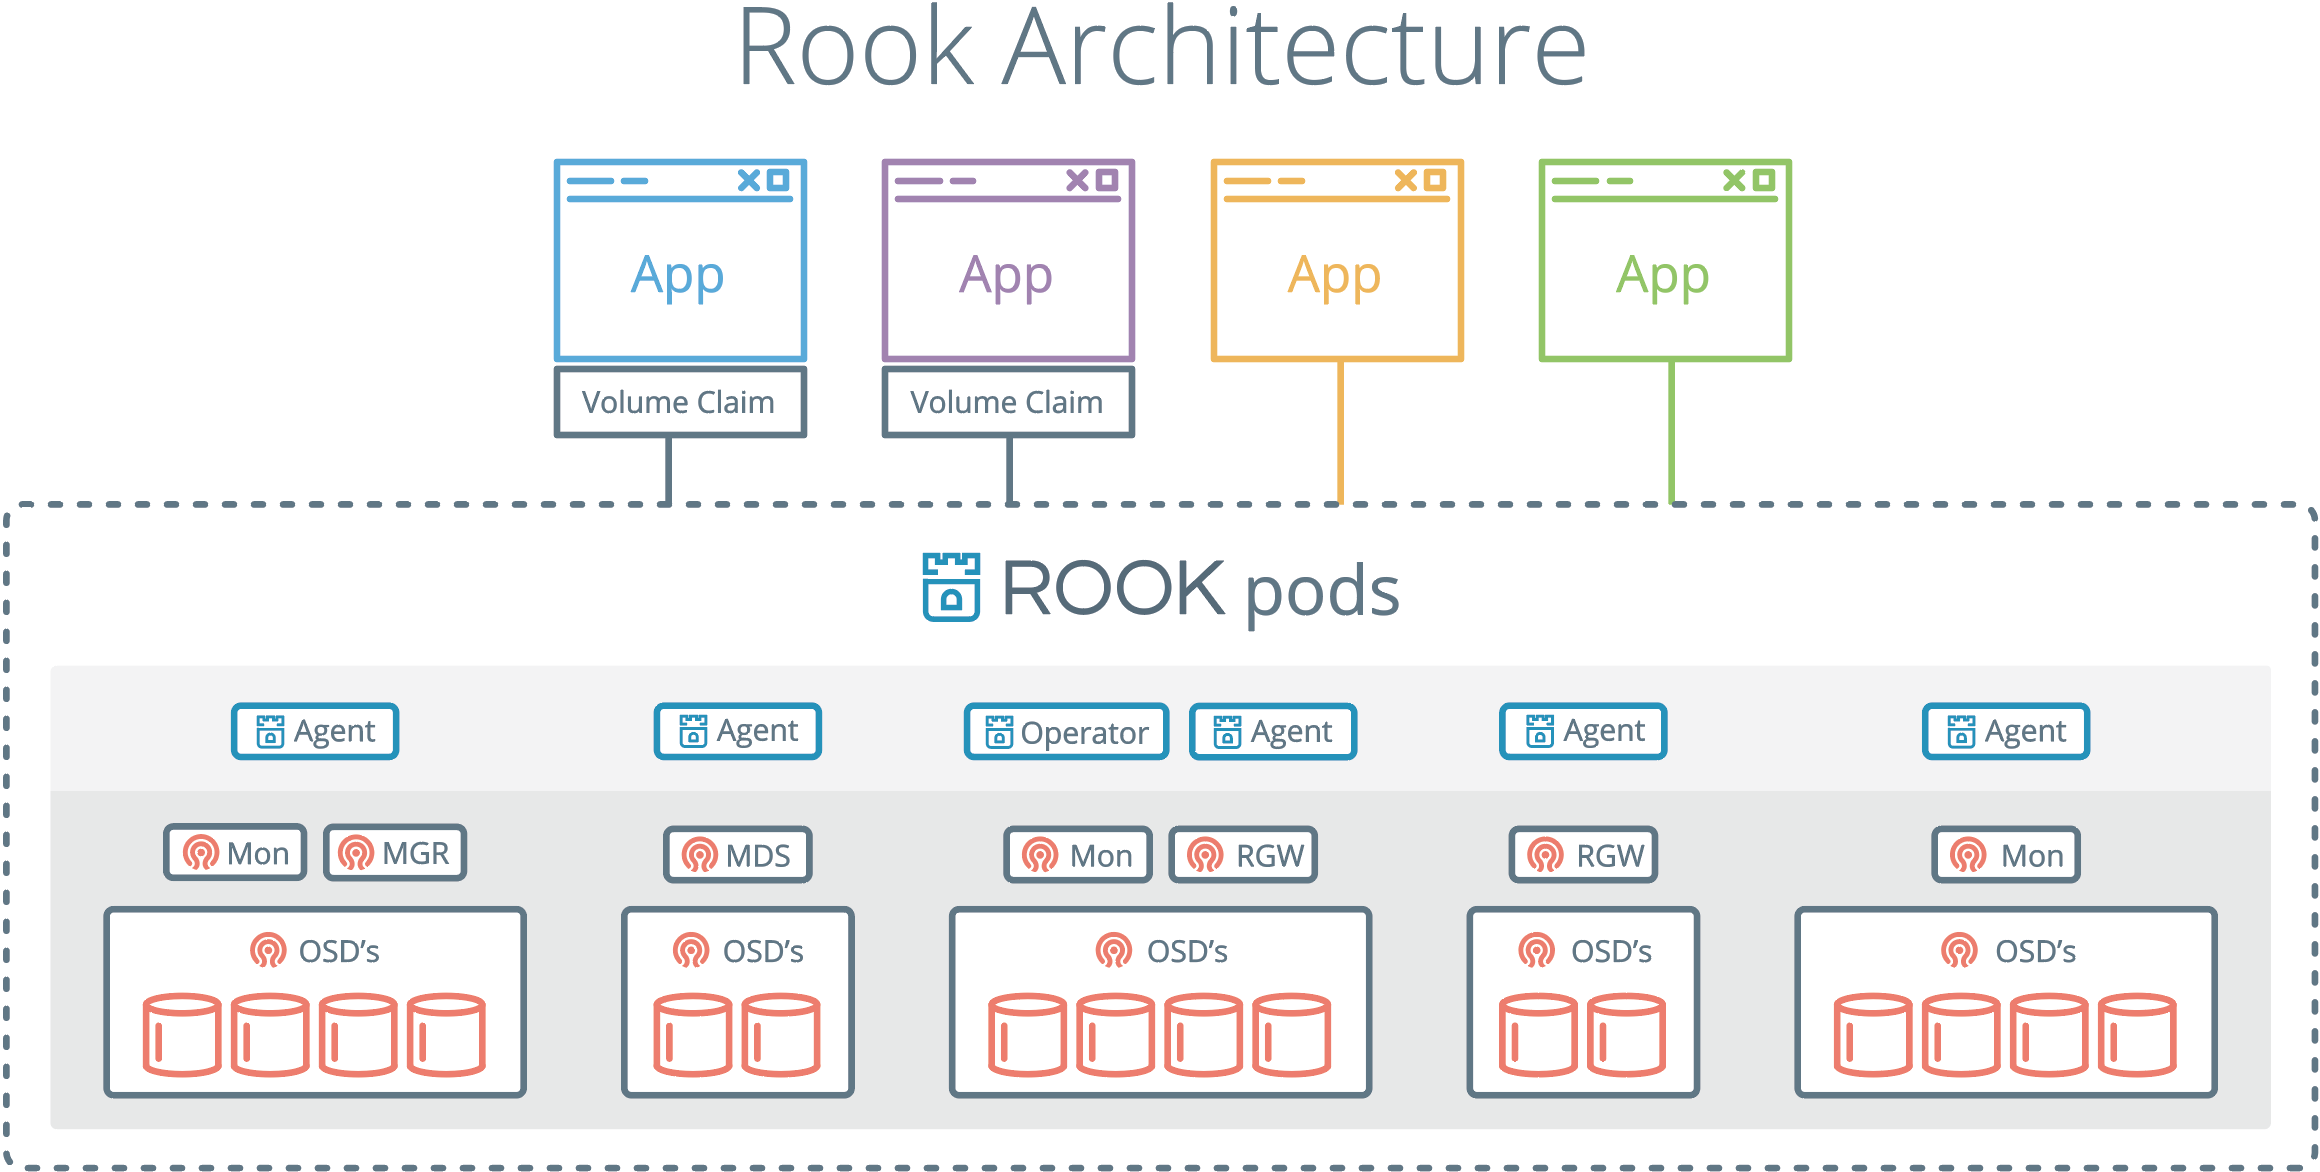
ROOK, long term short, it's initially created as a way to deploy ceph in Kubernetes supervised cluster, implement a operator to manage all service and pods for ceph.

First of all the official documentation is available in the GitHub repository, and to get sample yaml file, it is under rook repo rook/cluster/examples/kubernetes/ceph folder.
The common.yaml file is to create namespace for default ceph usage, create service account and ensure RBAC (role based access control) privilege, my home lab haven't change any setting regards of RBAC, so with just kubectl create -f common.yaml it can be created in the cluster.
Once the file as been applied, namespace rook-ceph will show up, rest of the deploy file have specified the namespaces it gonna deploy to, change the namespace context is not necessary at this time.
Now it's time to deploy the operator. The default operator yaml file for kubernetes is operator.yaml in the same folder, but before apply it, specify the nodes selector is must if not for long term use, we only mounted disk to some of the nodes.
Use kubectl tag nodes kube-centos-ceph1 role=storage-node or similar key-value pair to tag node. To check labels applied across nodes, just use kubectl get nodes --show-labels .
And modify the operator.yaml file:
apiVersion: apps/v1
kind: Deployment
metadata:
  name: rook-ceph-operator
  ...
spec:
  ...
  template:
  ...
    spec:
      serviceAccountName: rook-ceph-system
      containers:
      ...
        env:
        ...
        - name: AGENT_NODE_AFFINITY
          value: "role=storage-node"
        ...
        - name: DISCOVER_AGENT_NODE_AFFINITY
          value: "role=storage-node"
And rest setting as desired, like: ROOK_CSI_ENABLE_CEPHFS, or ROOK_CSI_ENABLE_RBD if you only want one of the plugin to be enabled, but for future experiment, I'll leave them as true.
Once we are happy with the setting here, use kubectl apply -f operator.yaml to deploy the operator in the cluster, Notice that in the recent change of ROOK, rook-agent pod won't be created anymore, The rook-discover and rook-operator pod should show up under rook-ceph namespace after issue this command.
The cluster.yaml file need more attention on it, this is the CRD(Custom Resource Definition) needed by operator, as it controls how ceph cluster storage is deployed, and operator reads the config from it and acts according this file.
First the node selector needs to be specified, as usual, deploy it only to storage-node:
spec:
  ...
  placement:
    all:
      nodeAffinity:
        requiredDuringSchedulingIgnoredDuringExecution:
          nodeSelectorTerms:
          - matchExpressions:
            - key: role
              operator: In
              values:
              - storage-node
And as I only have 2 storage nodes, change the mon pod with replica needed:
spec:
  ...
  mon:
    count: 2
    allowMultiplePerNode: false
Although it is recommended to have 3 mon, we only have 2 nodes here that won't be created anyway.
Ceph - Filestore mode
Next is to specify the configuration of storage device/directories, Ceph recommended to use directly storage device mount to the pod and access it without host OS operation on the disk. Here I'll introduce both of them starting with filestore mode:
The default folder is /var/lib/rook , change /etc/fstab to mount the SSD /dev/sda to this folder make sure the access privilege of it and then change config in cluster.yaml like:
 storage:
    useAllNodes: true
    useAllDevices: true
    deviceFilter:
    location:
    config:
    directories:
    - path: /var/lib/rook
Now hold your breath and kubectl apply -f cluster.yaml , if every thing configured correctly, after some minutes of bootstrapping, everything should show up:
csi-cephfsplugin-6m756                           3/3     Running     0          1m
csi-cephfsplugin-8w8nr                           3/3     Running     0          1m
csi-cephfsplugin-fcqfq                           3/3     Running     0          1m
csi-cephfsplugin-nntnc                           3/3     Running     0          1m
csi-cephfsplugin-provisioner-75c965db4f-f2wzk    4/4     Running     0          1m
csi-cephfsplugin-provisioner-75c965db4f-j95gm    4/4     Running     0          1m
csi-cephfsplugin-z646x                           3/3     Running     0          1m
csi-rbdplugin-8h7h4                              3/3     Running     0          1m
csi-rbdplugin-d7rdh                              3/3     Running     0          1m
csi-rbdplugin-h7mlx                              3/3     Running     0          1m
csi-rbdplugin-mdrkr                              3/3     Running     0          1m
csi-rbdplugin-provisioner-56cbc4d585-6n2pc       5/5     Running     0          1m
csi-rbdplugin-provisioner-56cbc4d585-fnx2j       5/5     Running     0          1m
csi-rbdplugin-qmtmf                              3/3     Running     0          1m
rook-ceph-mgr-a-6fdf485f7c-n8pqh                 1/1     Running     0          1m
rook-ceph-mon-a-7bd456b447-mjtcq                 1/1     Running     0          2m
rook-ceph-mon-b-667b96f697-k2rxw                 1/1     Running     0          2m
rook-ceph-operator-66485f4894-cfpzn              1/1     Running     0          5m
rook-ceph-osd-0-5ffd6b565c-7spm4                 1/1     Running     0          1m20s
rook-ceph-osd-1-7654f9884-vmnhs                  1/1     Running     0          1m10s
rook-ceph-osd-prepare-kube-centos-ceph-1-r7l4c   0/1     Completed   0          2m
rook-ceph-osd-prepare-kube-centos-ceph-2-mkfbv   0/1     Completed   0          2m
rook-ceph-tools-856c5bc6b4-lrskn                 1/1     Running     0          30s
rook-discover-ff588                              1/1     Running     0          5m
rook-discover-vvc9h                              1/1     Running     0          5m
Notice that the operator in some case get stuck and pending when cluster.yaml file changed and applied, delete the pod rook-ceph-operator will help it to discard all previous state.
Some common issue is pod need to access correct device or folder, the mon-a maybe failed to startup because it can't find or can't access specified path.
And if the network isn't stable, the operator may not be able to check the status of mon pod, thus it won't proceed.
Bootsrtapping ceph takes some time, osd may not show up in first couple of minutes, osd-prepare-<node-name-here> will Perform the checking and scanning the status for storage device. It will persist log of result when scanning the node, check the log when there is no osd created by operator.
When pod failed to start and goes to CrashLoopBack status, describe it won't help much, try check logs of operator instead.
Ceph -bluestore mode
To deploy ceph in to bluestore mode (which is recommended in ceph official documentation), The first thing is to umount the hard drive from node, like umount /dev/sda then use wipefs /dev/sda -a to wipe out file system in the drive, this ensures when installing the osd, nothing will operate disk and interfere the osd-prepare pod.
Then config storage to suit the environment; for example, I config my storage one by one so I get more control on which device I will deploy osd to:
  storage:
    useAllNodes: false
    useAllDevices: false
    topologyAware: true
#    directories:
#    - path: /var/lib/rook
    nodes:
    - name: kube-centos-ceph-2
      deviceFilter: ^sd.
    - name: kube-centos-ceph-1
      deviceFilter: ^sd.
Comment out directories (default of this yaml file), config which device or use deviceFilter to specify the device store the data. And useAllDevices must set to false when specify the device by node.
Apply this cluster and debug is same method compare to filestore mode.
We are not storing data to /var/lib/rook directory, but the access privilege still need to be guaranteed, mon pod still needs to store some data it needs to this folder.
Status and usage
The rook-ceph-tools is the default toolbox for control ceph by command line tools, yaml file is toolbox.yaml .
Once the tool box is deployed, execute bash in the pod and use ceph status to check if ceph is running with correct status.
If the status is as expected, similar like:
  cluster:
    id:     d35178e3-3328-48c2-943d-82f5db61d2a6
    health: HEALTH_WARN
            too few PGs per OSD (4 < min 30)

  services:
    mon: 2 daemons, quorum a,b (age 17h)
    mgr: a(active, since 17h)
    osd: 2 osds: 2 up (since 17h), 2 in (since 3w)

  data:
    pools:   1 pools, 8 pgs
    objects: 43.88k objects, 6 GiB
    usage:   12 GiB used, 1.7 TiB / 1.7 TiB avail
    pgs:     8 active+clean
We can proceed to configure storageclass in the cluster, ROOK already provides the sample storageclass.yaml under rook/cluster/examples/kubernetes/ceph/csi/rbd/ .
But if this is the default storage of all volume, set it as default storageClass is a good idea, change this yaml file like:
apiVersion: storage.k8s.io/v1
kind: StorageClass
metadata:
   name: rook-ceph-block
   annotations:
      storageclass.kubernetes.io/is-default-class: "true"
This file also specify the replication of the data, default is 3, but ceph already replicate your data if you have more than one osd, if leave it as 3, it will end up takes 3 more replica we don't need, change it to 1 is what I did here:
apiVersion: ceph.rook.io/v1
kind: CephBlockPool
metadata:
  name: replicapool
  namespace: rook-ceph
spec:
  failureDomain: host
  replicated:
    size: 1
After apply this file, use kubectl get sc to check storageClass in the cluster, result should similar to:
NAME                        PROVISIONER                  AGE
rook-ceph-block (default)   rook-ceph.rbd.csi.ceph.com   6m
Now, you can claim volume when create your deployment etc. it will get a chunck from Ceph cluster:
NAME                  STATUS   VOLUME                                     CAPACITY   ACCESS MODES   STORAGECLASS      AGE
kube-nextcloud-data   Bound    pvc-2ff2045a-d931-46fb-9931-e4b86db1001f   800Gi      RWO            rook-ceph-block   10m
kube-nextcloud-db     Bound    pvc-5bd22c61-9864-4e0f-9985-6616ecba56f8   5Gi        RWO            rook-ceph-block   10m
And enjoy your cluster with a storage!


