I decided to build a NAS with old hard drives chiefly for serving media files like movie, TV shows and music.
When building a multi-bay system, it's inevitable to consider which kind of disk redundancy to use. Traditional RAID (both hard and soft ones) would work, but it also have several cons:
- Data are distributed onto disks so that it could be not read from a single drive
- Requires several disks to work simultaneously when reading or writing
- If all parity disks plus 1 more disk corrupt, all data will be lost
For home data storage, I'd prefer scheduled cold backup. But is there any way to enjoy some benefits from RAID without "real RAID"? Yes, there is!
Backgrounds
MergerFS
MergerFS could pool multiple filesystems or folders into one place. It allows us to create RAID0-like filesystems but keeps data intact when some drives are broken.
mergerfs is a union filesystem geared towards simplifying storage and management of files across numerous commodity storage devices. It is similar to mhddfs, unionfs, and aufs.
SnapRAID
SnapRAID is short for "Snapshot RAID". It is a backup program for disk arrays and capable of recovering from up to six disk failures. It is mainly targeted for a home media center, with a lot of big files that rarely change.
Some highlights of SnapRAID are:
- The disks can have different sizes
- Add disks at any time
- Quit SnapRAID without moving data and formatting disks
- Anti-delete function
Differences between mergerfsfolders & unionfilesystems
There are 2 similar plugins based on mergerfs in OMV-Extras:
mergerfsfolderspools foldersunionfilesystemspools drives
With blank new drives here, we would use unionfilesystems for simplified configuration.
Prepare System and Drives
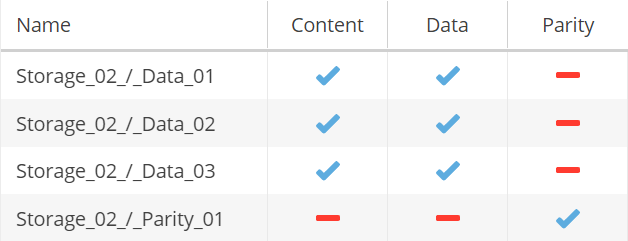
I have 4×2TiB hard drives and plan to use 3 of them for data and 1 for parity check.
In OpenMediaVault:
- Install and configure OpenMediaVault as needed.
- Install OMV-Extras repository.
- Install
openmediavault-snapraidandopenmediavault-unionfilesystemplugin. - Wipe all the disks and create filesystems on them.
I also labeled all file systems with DXX for data disks and PXX for the lonely parity disk.
Configure MergerFS
In OpenMediaVault control panel:
- Navigate to Storage > Union Filesystems.
- Click on Add.
- Type a pool name in Name.
- Check all data disks (but exclude parity disks) in Branches.
- Select Existing path, most free space (or
epmfs) in Create Policy. - Save and apply.
Here I set create policy to epmfs because I want the files gather together as possible as they could be. Under epmfs policy, new files will be created together in the same drive when the upper level folder path exists. You can check other available create policies upon your needs.
Note that some applications (`libttorrent` applications, sqlite3, etc.) requires mmap. Since I would use qBittorrent, I need to add some options:
allow_other,use_ino,cache.files=partial,dropcacheonclose=true,...Also as I have labeled data disks as D01, D02 and D03, I expect MergerFS write files into them in that given order. Unfortunately this order could not be specified or modified via the control panel. I have to edit /etc/fstab:
....
/srv/dev-disk-by-uuid-${D01}:/srv/dev-disk-by-uuid-${D02}:/srv/dev-disk-by-uuid-${D03}            /srv/${MERGERFS_UUID}       fuse.mergerfs   defaults,allow_other,cache.files=off,use_ino,category.create=ff,minfreespace=4G,fsname=${MERGERFS_NAME}:${MERGERFS_UUID},x-systemd.requires=/srv/dev-disk-by-uuid-${D01},x-systemd.requires=/srv/dev-disk-by-uuid-${D02},x-systemd.requires=/srv/dev-disk-by-uuid-${D03} 0 0
....
Save the file, umount and mount MergerFS mountpoint. Now the writing order is corrected.
Configure SnapRAID
First configure data disks. In OpenMediaVault control panel:
- Navigate to Services > SnapRAID.
- Navigate to Disks tab.
- Click on Add.
- Select a data disk for Disk.
- Check Content and Data, then click on Save.
Repeat this until all data disks are added. Then configure parity disks:
- Repeat step 1-4 when configuring data disks.
- Check Parity , then click on Save.
Also repeat this until all parity disks are configured.
Initialize and Use SnapRAID
First Start
After SnapRAID is set up for the first time, you should synchronize the data, create and check parity. There are several useful commands:
synchashes files and save the parity.scrubverifies the data with the generated hashes and detect errorsstatusshows the current array status
So in combined:
snapraid {sync, scrub, status}Rules
Not every piece of data worth backing up. Most of the time for home usage, only "static files" need to be backed up. For example, there is no strong necessity to back up container images, caches and other temporary files. These directories or files could be excluded in Rules tab.
Scheduled Diff and Cron Jobs
Click on Scheduled diff button and SnapRAID plugin will generate a cron job in Scheduled Jobs tab. This job only contains diff operation which calculates file differences from the last snap. To maintain the parity synchronized, sync and scrub jobs are also needed. If you plan to synchronize automatically, you would like to check a helper script when creating jobs.
Sometimes empty files could be created by programs and cause errors:
The file '${FILENAME}' has unexpected zero size!
It's possible that after a kernel crash this file was lost,
and you can use 'snapraid fix -f ${FILENAME}' to recover it.
If this an expected condition you can 'sync' anyway using 'snapraid --force-zero sync'
If that file seems to be fine with a zero content with you, simply add the --force-zero parameter to synchronize.


